
- What is a Custom Report Type?
- When Should You Use a Custom Report Type?
- How to Create a Custom Report Types?
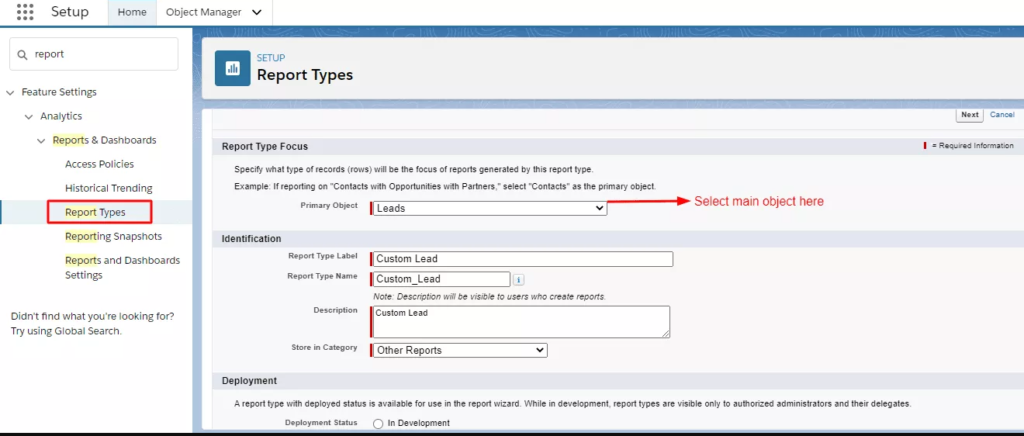
- 1. Go to Setup > Enter report type in the Quick Find Box > Select Report Type
- 2. If an information page appears, Click Continues.
- 3. Click on the New Custom Report Type button
- 4. Don't forget to set Deployment Status as Deployed after filling out the data.
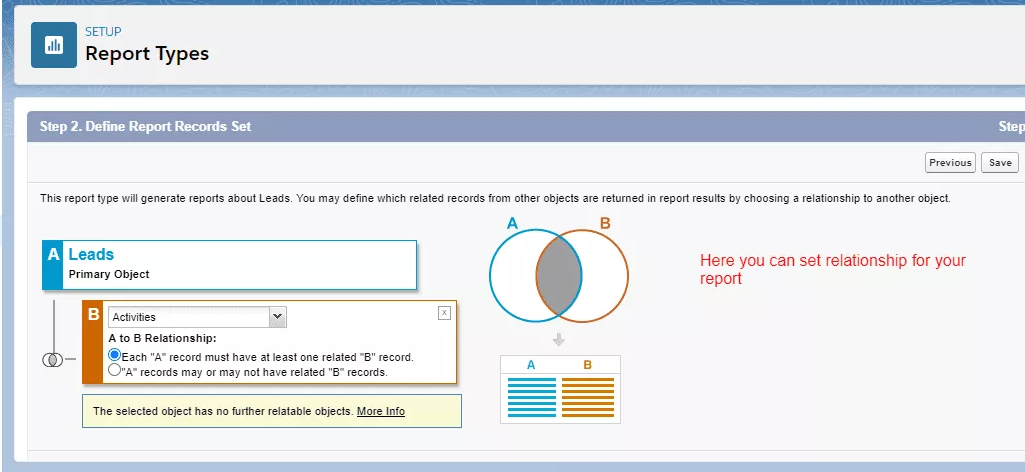
- 5. Next, choose the associations/relation you wish to use in your report.
- 6. Click Save, and It is Complete
- 7. You will get a detail page for your specific record once you have set this.
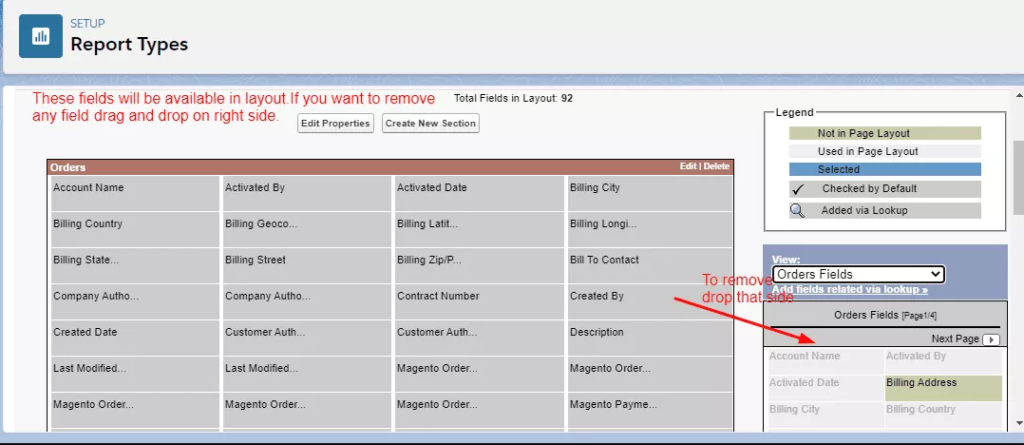
- 8. Click the Edit Layout button to change the report's layout.
- 9. Save and you are all set.
- Frequently Asked Questions
What is a Custom Report Type?
Salesforce’s custom report types let you build more detailed reports than the platform’s default report kinds. For instance, Salesforce includes report types for all common objects and standard object connections. “Contacts & Accounts” or “Product Opportunities.” When generating a new report, you can see a list of report types
When Should You Use a Custom Report Type?
Custom report types come into play when you wish to go further than default and automatically generate report kinds. If you need to, you should consider creating a custom report type if you want to:
- Report on more than two items simultaneously?
- Instead of only utilizing a “with” relationship, why not report using “without” a relationship (e.g., Contacts without Accounts)?

How to Create a Custom Report Types?
We will discover how to create custom report types in Salesforce in this article. A mountain of data is useless for analysis. So you will require reports to accurately analyze your data.
There are certain pre-built report kinds in an organization; however, occasionally, we need to construct new report types for specific objects or to combine numerous items. The steps to perform it are shown below.
Related Post: How To Use Database.Stateful In Batch Apex In Salesforce
1. Go to Setup > Enter report type in the Quick Find Box > Select Report Type
2. If an information page appears, Click Continues.
3. Click on the New Custom Report Type button
4. Don’t forget to set Deployment Status as Deployed after filling out the data.
5. Next, choose the associations/relation you wish to use in your report.
6. Click Save, and It is Complete
7. You will get a detail page for your specific record once you have set this.
8. Click the Edit Layout button to change the report’s layout.
9. Save and you are all set.
Now you can use this report type to generate a custom report type in salesforce.
I hope you’ll find this blog helpful for creating custom report types in salesforce. For additional subjects, continue reading.
Want assistance with the salesforce project? Work with one of the top Salesforce consultants when you hire Octal IT Solution.
Frequently Asked Questions
You can access Salesforce custom objects using custom report types or standard objects through custom views. For instance, your admin may develop a particular report type that enables customers to access fields from Products and Opportunities.
Up to 60 object references can be included in a custom report type. For instance, if you choose a report type with a maximum of four object associations, you may choose fields through lookup from an additional 56 items.
Navigate to the relevant report. While reading the report, click Edit. The current report type will be shown in the upper-left corner of the report edit page.
In Salesforce, you can produce reports in four formats: tabular, summary, matrix, and joined. Depending on what you want from a report, each one is ideally suited to display various data.
A Standard Report Type will display all opportunities visible to the Running User and satisfy the requirements. Only opportunities held by users with the same role will be displayed in a custom report type.

 By
By July 23, 2025